More Fun with Cement

Happy Crafty Thursday!

After I finished my crushed cement cup planter project I decided to play around with the extra cement and try out a few other projects.  I don’t have specific tutorials for any of these, but I’ll try to write up a few tips for each idea.

Cement Candle Holder by the3Rsblog

First I made small versions of the crushed plastic cup project, with dixie cup sized plastic cups. I didn’t have a specific plan when I was making them, but afterwards I discovered they made perfect candle holders! I used the same plastic dixie cups to create the center opening, and I found it worked best when the depth of the indent was approximately twice the depth of the tea lights, since that way the flame is protected from wind.

the3Rsblog_CementCandleCups_1

My second project was a tweak on these candle holders, with a touch of gold added in. For the outside marbled effect, I took a tip from a tutorial video I’d spotted on Pinterest where they dripped liquid gold leaf into the wet cement before adding the interior indent mold. Unfortunately I didn’t think the final effect was as impressive as in the video I’d seen, most of the gold ended up looking really tarnished and more like brown stains than gold. So I decided to at paint the rim and the interior of the cups with the gold  leaf after they had hardened. I think it helps add to the effect of the exterior gold, but they still aren’t my favorite project.

the3Rsblog_CementCandleCups_2

The final fun little project I made were alphabet magnets. I used silicon ice cube trays for the letters (purchased from Amazon) and then I used a two part epoxy glue to attach some rare earth magnets to the back. It was a little tricky because not every letter has a nice center spot for a magnet, and my magnets were a touch large for the skinnier letters. But it worked in the end. I found that with the smallish openings for the letters, adding extra water to the cement was really helpful so it flowed more easily. The ice cube trays were also really deep, so I only filled each letter approximately half way full, to cut down on the weight of the letters. They ended up about 1/2 inch thick. Unfortunately they are pretty brittle, I’ve already broken the ‘B’ in half, but super glue works well for any broken letters. And if the alphabet isn’t your cup of tea, there are a ton of silicon ice cube and candy molds out there to play with! I can’t wait until some of my nieces and nephews are a bit older and I can make fun magnets for them. I already have my eyes on some adorable dinosaur molds at Michael’s!

the3Rsblog_CementAlphabetMagnets_1

I made some cute puzzle piece magnets for school using the same technique. Unfortunately that mold was for candy melts, and was very shallow. And because the puzzle pieces had some thin joints, they’ve already broken in a number of places. But, the fun twist I added was that I painted the edge of each puzzle in a different color, using simple acrylic craft paint. It was so super cute I’m thinking I might try the same technique with these alphabet magnets. They would also look really cute dipped at an angle into the paint, so you cover about 1/3 of each letter to leave plenty of the cement uncovered.

I hope this has gotten your creative juices flowing!  I have one more fun cement project that I’ll post a tutorial for next week.

Ciao until then, Allison

Posted in Uncategorized | 1 Comment

Marbled Indigo Easter Eggs

Happy Crafty Monday!

The easter eggs from my previous post were all eggs I had decorated last year, but I when I wanted a few more eggs for my easter tree I decided to try out a new technique: marbling with nail polish and water.

Marbled Indigo Easter Eggs from the3Rsblog

My inspiration were these stunning eggs from Alice & Lois that I spotted on Pinterest. They have a full tutorial and lovely process photos on their page, which I recommend checking out. The nuts and bolts are that you drip nail polish into a container of water, swirl it around, and then dip the egg into the polish.

Marbled Indigo Easter Eggs from the3Rsblog

I tried two different techniques. If you have eggs you don’t want to eat (I had a few really old eggs) then you can simply drop them into the bin of water raw, and they will sink. Then you blow them out after and discard the egg. The other technique I employed the3Rsblog - Egg Dyeing Tool Diagraminvolved blowing out the eggs first, so you can eat the liquid egg. Then I created a sort of egg dipping handle, using a bent paperclip. I had a small bend at one end, and then after sliding the hollow egg onto the paperclip I bent the long end up in the opposite direction to serve as a handle. I could then hold onto the long end and use it to dip the egg down through the nail polish without the hollow egg floating.

Marbled Indigo Easter Eggs by the3RsblogMy first attempts were cool, but had limited marbling and few white areas. I think my problem was too much polish, but also too small a surface area of water. So I tried again with a larger container and while I was able to get more white areas, I was also really struggling with the nail polish forming a film too quickly and then not sticking properly to my eggs. Though I have to say I ended up with some pretty cool finished products, I don’t know if I’d call it ‘marbled’ per se. (See image to left.) I had been using room temperature water like the Alice & Lois tutorial recommended, but with some further research it sounds like hot water might have been better, it might have slowed the polish hardening.

Marbled Indigo Easter Eggs by the3Rsblog

After the eggs had dried, I strung them with ribbon to complete the look. When I was blowing the eggs out I made sure to create large holes at both the bottom and the top of the egg, since I knew I was going to be using ribbon. I then used a tapestry needle to thread the ribbon through the egg. For these eggs I threaded the ribbon through the egg from the bottom, and then back down from the top leaving a loop out the top. Then I double knotted the ribbon at the bottom of the egg, and trimmed the ends at an angle.

Marbled Indigo Easter Eggs by the3Rsblog

I also had one egg that I had soaked in some red cabbage juice to get a subtle blue tint, and then I dipped it in the polish leftovers after dipping another egg. So the coloring of the final egg was a more subtle blue on blue than the other eggs, but I think it is also really pretty.  Here you can see the different sides, it was harder to capture this egg in photos than the others, for some reason.

Marbled Indigo Easter Eggs by the3Rsblog

All in all, I’m pretty excited with how these turned out, though I also feel like I have a lot still to learn about this technique. But, the wheels in my head are already spinning with other items I can decorate with some marbled nail polish. I’d love to hear if you have tried this technique and how it worked for you.

Marbled Indigo Easter Eggs by the3Rsblog

Ciao for now, Allison

Posted in Uncategorized | Leave a comment

Easter Eggs

Happy Crafty Monday!

Easter Egg Decorations from the3Rsblog

Last year I was visiting family in Vienna right before Easter, and I loved all the decorations. Every shop and restaurant was decorated with branches strung with hanging Easter eggs. It was positively captivating! And I knew I just had to try and recreate the effect at home. And thus began my experimenting with different egg decorating techniques, some of which I thought I’d share with you today.

Sharpie decorated easter egg - by the3Rsblog

For all of these designs I used real egg shells, carefully blown and washed.  Honestly one of the hardest parts was getting the thread from one side to the other, and in the future I might take some inspiration from the beautiful eggs I saw in Vienna and use a pretty grosgrain ribbon instead.  The first set I made were decorated with sharpie, in a variety of patterns and simple drawings. So far I stuck with just white shells, but it might be pretty to incorporate some brown ones too. These eggs are simple to recreate and no fancy supplies necessary, just a clean shell and your favorite sharpie!  I love the crisp black and white, but it could look really pretty with some brightly colored grosgrain ribbon too. I am envisioning a whole tree with black and white eggs and a rainbow of different ribbons. Though a simple color palette of pinks and greens could be elegant too.

Sharpie decorated easter eggs - by the3Rsblog

The second design I played around started with a design that would pair well with my sharpie decorated eggs. Shells stamped with alphabet letters! I have a bunch of different sets of letter stamps, mostly purchased from the $1 bin at Michael’s, and so I played around with a few different letter types, plus color combinations.

Hand Stamped Easter Eggs - by the3Rsblog

I love the idea of the white on the brown shell, but the white ink I had was a thicker paint-like ink, and it retained a bit of it’s sticky quality which I didn’t like.

Hand Stamped Easter Eggs - by the3Rsblog

The black ink I had was from a more traditional harder ink pad, so the ink didn’t have that thick paint-like quality and I like how it looks on the egg shell better. It was certainly fun to play around with the different colors and fonts. Each time I try a new version I like it better than the last. The one problem with the thinner ink was that it was a bit slippery, and every now and then as I tried to stamp the letter my hand would slip slightly and smudge the ink. You can see a couple of smudgy places on these eggs but it doesn’t really ruin the look so it’s not the end of the world.

Hand Stamped Easter Eggs - by the3Rsblog

The third design reminds me a bit of one of those snowball deserts with the coconut. I had a bunch of confetti created from scraps of coffee filters both dyed and plain white and I thought it might look fun glued on an egg. I smeared hot glue on the egg shell in small areas at a time, and then just dipped and rolled it in the confetti. It wasn’t what I was expecting but I kind of love it. It’s very ‘snowball coconut dessert’, if you ask me.

Confetti Easter Eggs - by the3Rsblog

I then decided to try decoupaging the confetti with mod podge, and again it wasn’t really what I was envisioning but it’s kind of cool. I think next time I might try a much paler pink, the colors all got much more saturated as they bled, and I was envisioning a paler color palette to better match the beautiful quince branches I used as my Easter tree.

the3Rsblog_EasterEggs_Confetti_02

I hope you enjoy these different decorating options, and if you try any of them for yourself I’d love to see the results!

Ciao, Allison


Posted in Uncategorized | 4 Comments

Crushed Cement Cups

Happy Crafty Monday!

As promised, I have an exciting new project to share with everyone today.  Small cement planters that look like crushed plastic cups!

Crushed Cement Cup Planters by the3Rsblog

Last March I was visiting a close friend in Munich when I spotted a video on Instagram about how to use a crumpled solo cup to make a small cement planter. I showed it to my friend and a day later we were in the German version of Home Depot buying cement. We had so much fun that I knew I just had to try and recreate this project once I got home.

Crushed Cement Cup Planters by the3Rsblog

I took a bunch of progress photos which I’ll show with the instructions below. But I also tweaked my technique as I went and I didn’t necessarily capture all of my final recommendations in these photos. I’ll make sure to point out when my recommendations differ from what the photos show, and you may need to use your imagination.

Materials:

  1. Cement – I used Cement All by Rapid Set. It’s available on Amazon but a LOT cheaper at a Home Depot or similar store.
  2. Plastic Cups – I used 16oz, 12oz and 8oz for various jobs.
  3. Plastic Spoons
  4. Duct Tape
  5. Latex gloves
  6. Sandpaper
  7. Water

Process:  

  1. You’ll need two cups for your mold.  I used 16oz cups for the outside, and while I originally used 8oz for the interior (shown in the photos) I found that if you are careful you can use a 12oz and then you have a much larger area for your plant and you use less cement. I am much happier with those planters, and so are my plants! I did make one 8oz planter which is adorable, but tiny and not very practical.
  2. Cover the exterior of your large cup in duct tape.  This is because when you start squishing and crumpling the cup, it might split or crack. It also helps the plastic to hold the crumple once filled with cement.
  3. Crumple your cup. Feel free to really squish it, every wrinkle will add detail to your finished planter and make it look more interesting.the3Rsblog_CrushedCementCups_Process1
  4. Let your cup pop back out to it’s full shape, while retaining the crinkles and indents.
  5. Double check that your interior cup can still fit without hitting any of the sides. This is especially important when you are using the 12oz cup inside. You may need to smooth out some of the larger indents.
  6. Put on your latex gloves and start measuring your cement and water. You need 4 parts cement powder to 1 part water. I usually used the large 16oz cups for mixing in, and a smaller 8oz cup for measuring approximate amounts, measuring up to a specific line along the side of the cup.  It doesn’t have to be super precise.  the3Rsblog_CrushedCementCups_Process2
  7. Start mixing. I found it was easiest to measure the water into my mixing cup first, and then add the cement powder a bit at a time. It will often feel like there’s too much powder but just keep mixing and it will all absorb the water, I promise.
  8. Once mixed, pour your cement into your mold. Because we are using plastic cups you don’t need any non-stick layer for the cement to release. Fill the mold about 1/2-2/3 of the way up. If you start inserting your center cup and there isn’t enough cement you can always add more, but you can’t really deal with overflows.the3Rsblog_CrushedCementCups_Process3
  9. Start inserting your center cup. I found if you use a stack of them it helps them hold their shape, and gives you a larger area to hold. This step is where I learned the most as I made my planters. You want to beware of pushing down on your center cup and then letting it rise back towards the surface. That will cause the cement to stick on the sides of the two cups, so your finished edge will have a sort of lip along the inner and outer edge, which just means more sanding and not as nice a finish. However if you only ever push down then the top surface of the cement will be flat or slightly convex, which is a much nicer edge. Here’s what happens to the wet cement when you let your center cup rise up after pushing it down, and what the final edge looks like with those lips, vs the nicer flat edge you didn’t need to sand.Crushed Cement Cup Planters - Process photos by the3Rsblog
  10. Here’s another step I tweaked. The original video I saw recommended taking duct tape and using it to tape the center cup down. However, this is where I found it is almost impossible to get it taped in place without it rising up a bit and giving you that ugly edge. Instead I used a bit of my cement to fill one of the smaller center cups, and make a cup shaped cement weight. I would drop that into the center cup in my stack, and it would hold the cup down. If you push your cup part of the way and then drop the weight in it will help it sink down slowly and evenly without rising back up and messing up your edge. If you plan on making more than one of these planters, I found it was a worth while step to take, making this center weight. But beware, you must make this weight first, so it is already hardened when you drop it in, and can therefore slip right out when you are done.
  11. When your cup has set, you can remove the center plastic cup by slipping the cement weight out, and then crumpling the cup towards the center while gently twisting and tugging.
  12. Now you just peel the outer cup off. First, remove the duct tape. Then cut the rolled plastic edge, and from there you can start peeling the cup away. You can do this as soon as your cement feels solid and is still warm to the touch, but beware it won’t have it’s full strength yet so be a bit careful. If you are using the 12oz cup you might want to give your planter an hour or two to set before you try to remove the mold, since the walls are thinner. I broke a few because I was too impatient.the3Rsblog_CrushedCementCups_Process4
  13. Sand any rough edges, or unsightly bumps with your sandpaper. Make sure your planter has had time to properly set first, I’d wait at least 24 hours to be safe.  Then just add soil, your favorite plant, and enjoy!

The cement is porous, so it will absorb water from your soil. You might find that you need to water your plants a lot. I found the plants that are happiest in the long term are super drought resistant plants like jades and other succulents which can survive their soil being sucked dry by the cement. It is one reason I didn’t bother trying to add drainage holes. If you are worried that the cement might get so wet it would damage the surface your planter is sitting on, you could try dipping the base of the planter into colorful latex paint. Wouldn’t a row of these dipped in bright rainbow colors look so cute along the windowsill of a children’s room?!

Crushed Cement Cup Planter from the3Rsblog

Also as you can see from some of the past photos, when you use an 8oz cup inside a 16oz cup, you get an edge that is approximately 1/2 inch thick. But if you use the 12oz cup you get the nice thin edge you see here, which is closer to a 1/4 inch thick. It is still structurally sturdy, but you use less cement, the thinner edge is more elegant, and you have a much bigger interior space for your plants. You can also see that for the larger inside cup you do sacrifice a bit of the crumpled look, since your crumples can’t be as exaggerated. So you’ll have to decide what’s more important for you.

Crushed Cement Cup Planters by the3Rsblog

I hope you have enjoyed this tutorial, I really loved how my planters came out, they are all lined up on my windowsill at work! If you give this project a try I’d love to see the results. And follow me on Instagram for more projects like this, @the3Rsblog.

Crushed Cement Cup Planters by the3Rsblog

Ciao, Allison

Posted in Uncategorized | 2 Comments

What I’ve Been Up To

Hello!

I know it has been a crazy long time since I’ve posted.  Over a year I think, and I’m very sorry for that.  But, I finally have some new craft projects to show you all!  I promise I’ll have at least a couple new posts over the next few weeks, but first I thought I’d show you what I’ve been up to that has kept me too busy to post new projects here.

As many of you know I have my own lighting business, and while we started by just selling pendant lights (many of which were first born here), my partner and I eventually expanded to special event lighting.  Specifically, paper flowers which are illuminated and could function as centerpieces and decor instead of traditional cut flowers.  Two summers ago we decided that in order to capture our new vision, we wanted to completely rebrand of our business.  So, Zipper 8 Lighting became Aster + Quail.

Aster + Quail Studio Ltd.

I’ll add a P.S. to the end of this post with the story behind our new name, but for now I wanted to show you some of what we’ve been working on because I am just so proud of how it all looks!  If you are curious to see more you can check them out on our website.  But for now, I hope you enjoy!  And come back tomorrow for a new craft post, involving a bit of a mess, some green leaves and a lot of fun.

Aster+Quail Magnolia CenterpieceAster+Quail Magnolia Centerpiece BlushAster+Quail Magnolia Wall FlowerAster+Quail Magnolia CenterpieceAster+Quail Wall Flowers Athena CollectionAster+Quail Rose Tinted Magnolia Centerpiece

Ciao, Allison


P.S. Here’s the story behind our new name, Aster + Quail:

Asteria was the Titan goddess of shooting stars, sister of Leto, and mother of Hekate. After the fall of the Titans, Asteria was pursued by Zeus through the starry heavens. To escape his advances, Asteria turned herself into a quail and flew into the Aegean Sea where she became the Greek island of Delos. Asteria’s story of transformation and illumination is what we are all about! From a lonely old map at the back of the bookshelf, to an illuminated paper flower extravaganza – this is what we are most passionate about.

Posted in Uncategorized | 1 Comment

Wood Sphere Magnets

Wood Sphere Magnet Tutorial by the3RsblogI was traveling this summer and had a chance to visit a number of museum gift shops, which are some of my favorite shops when traveling because the items you find are often quirky, and artsy, and usually not super touristy but still unique enough to feel like you wouldn’t see them in your everyday life.  And in one of these shops I spotted some awesome completely amazing magnets that were made out of wooden spheres.  I fell in love, and purchased a set of 6 because they weren’t cheap enough to purchase more, but as soon as I got home all I wanted was to populate my life and all of my magnetic boards with these adorable magnets, and so I decided to try making my own.

Materials: 1″ Wood ball dowel caps, 5/16″ Wood dowel, Xacto blade, Rare Earth Magnets, Super glue, E6000, T Pins, Small Cupcake PanWood Sphere Magnet Tutorial by the3Rsblog

Step 1: Fill the hole.  I chose to purchase wooden spheres with holes pre-drilled, meaning I didn’t get to choose the depth of the hole and it was way too deep for my magnets.  So I purchased a wood dowel and used it to fill the hole.  Insert the dowel into the hole and make a pencil mark at the edge of the sphere, this will measure the depth of the hole.  Then use your magnet to mark off the depth you need to leave free to glue your magnet so the top edge of the magnet is flush with the outside of the wood sphere.  Use the Xacto blade to cut your dowel down to length.  Don’t worry if it isn’t precise – we aren’t factories here, we are people – it probably isn’t going to be precise, just own it and move on. This diagram shows what the finished piece will look like if we cut it down the middle, with the wood sphere, the filler dowel and the magnet on top.Wood Sphere Magnet Tutorial by the3Rsblog

Step 2: Glue the dowel in place.  Use a drop of super glue at the bottom of the hole in your sphere to secure the dowel in place.  Don’t purchase a dowel that is too large, it is better to have the dowel slide in easily than to worry about getting it precise.  No one will see what the dowel looks like once you are finished.

Step 3: Glue the magnet in place.  This was by far the hardest step, for a few reasons.  Dealing with magnets, and especially the super strong rare earth magnets, can be a pain.  They are small and difficult to handle with just your fingers, but being, well, magnets, they stick to every tool I have.  If anyone out there knows of pliers made of plastic that I could use to hold these magnets and get them into place, please let me know!  I chose to use E6000 so that I could get a nice strong hold on my magnets, with their shiny surface they often peel off any glue I’ve tried before, especially hot glue.  So, I used E6000 which is very strong but unfortunately takes 24 hours to cure, which means I needed a way to make sure the magnet stayed where I wanted it, which was flush to the outer edge of the sphere so it would make contact with any future magnetic surfaces.  However, rarely was my dowel the precise correct height to get the magnet into the perfect place, so I used T pins to ‘hang’ the magnet in place while the glue cured.  Basically the magnet stuck to the T pin, and the T pin sat exactly flush with the surface of the sphere, so it meant that the magnet would cure into the glue at exactly the correct height.  Why bother with the dowel at all if I was going to hang the magnets off the T pins like this anyway?  Because E6000 shrinks when it cures, and its one thing to fill in the fractional space between the dowel and the magnet with glue, its another to fill in half an inch of air with glue.

Wood Sphere Magnet Tutorial by the3RsblogStep 4: Let the glue cure.  Ok, I amend my previous statement, thinking back I actually think leaving the glue to cure may have been the hardest step.  Because, while the magnets and glue were difficult to deal with, there was also the fact that the spheres were round. (Shocking, I know.)  And therefore trying to set them aside to cure with the magnets face up was nearly impossible.  They kept rolling away!  So to solve this I pulled out a small brownie pan that I’ve used for other non-food crafting, and used the little cups to prop the spheres up while the glue cured.  This also had the benefit of keeping the magnets away from each other, since they are so strong they had a tendency to jump to each other if they got at all in the vicinity.  Have I mentioned before how much I hate working with magnets?

Wood Sphere Magnet Tutorial by the3RsblogStep 5: Enjoy!  I love how rustic yet modern and polished these look.  And natural wood is very popular these days.  If I was going to do this project for a children’s room I might choose to paint them bright glossy colors so they looked more like plastic, they might even look like gum balls! But for my purposes I am over the moon with the unfinished wood.  The wood is very smooth to the touch so you don’t need to paint or varnish or seal them if you don’t want to.  You also get to see all the beautiful wood grain.Wood Sphere Magnet Tutorial by the3Rsblog

What do your favorite magnets look like?  I’d love to hear about them in the comments below.

Ciao, Allison

Posted in Uncategorized | 3 Comments

Mason Jar Gifts

Now that Fall is here (while according to the calendar it is still Summer, since I work in a school it most definitely feels like Fall) I thought it might be time to look forward to gift giving season.  I have to say, I love gift giving.  Whether it is during the holidays or for someone’s birthday, I love the hunt of figuring out exactly what is the perfect gift for each person in my life and searching for it, or even assembling a group of different items to make one larger gift.  And that is exactly what this post is about. Mason Jar Gifts by the 3 R's blog

Last year one of my cousins suggested giving Mason Jar Gifts which had been so popular on Pinterest.  And if you couldn’t already have guessed, this was right up my alley!  For anyone who hasn’t seen these around the internet, the idea is to assemble a gift into a mason jar, usually bringing together small items that can all fit some theme, as well as physically fit inside the jar!  That is the tricky part, because let me tell you finding items small enough to fit through the mouth of a standard jar is hard.  I added the additional detail of attaching small plastic animals to the lids and spray painting them gold, for some added flair.  This post isn’t going to be a traditional tutorial, because let’s face it I’ve posted a lot about painting small plastic animals recently, this is going to be more about giving you ideas of how you could create your own mason jar gifts.

First, the items inside don’t necessarily have to be extravagant, it’s about the concept.  I avoided the whole “cookie recipe in a jar” idea, though I did receive one of those in my gift exchange!  But I have twin cousins who are in college so I thought some sort of comfort food gift would work, so I made them a “Winter College Survival Kit in a Jar”.  First I found those adorable mason jars with handles, and I knitted them mason jar cozies.  I’ve just realized I didn’t take any photos sadly, oops!  But I did find that this small scale project was the perfect chance to practice new cable knit and braid stitches which turned out to be easier than I might have expected.  Remember my whole “it’s hard to find items small enough” from the last paragraph, yea that was especially true with this gift, so much so that I ended up giving them two mason jars!  They got the mugs with the cozies, stuffed with tea and hot chocolate packets, and I bought chalkboard mason jar lids which I decorated with a chalk pen that I then tied to the outside.  I also included a bunch of glow bracelets that I found at Michaels in the dollar section.  Then in the jar with the animal lids I included a cute pair of socks, various forms of lip balm and lip gloss, and I tied a larger beauty product I got at Sephora to the outside.  Some things just wouldn’t fit in either jar.Mason Jar Gifts by the 3 R's blog

But the jar I was really the most pleased about was the one for my other cousin Scout. She had just graduated from college and had expressed interest in journalism, so I decided I wanted to make the jar a sort of “New Journalist/Recent College Grad in NYC Kit in a Jar.”  Who says you have to name the theme anyway, right?  For Scout I got the idea to decorate a few small moleskins to make them more personal.  I used a pencil eraser and gold stamp ink to create polkadots on one cover, and then I used a gold paint pen to paint her name in script on the other.  I found the fun font online and then printed it out and transferred it with pencil to the cover to copy.  I would not have been able to freehand that.  The hardest part was finding a jar that would fit the moleskins, even though they were super small.  Finally I found one, I think it was possibly one of the largest mason jars you can find!Mason Jar Gifts by the 3 R's blog

For the other items I tried to find a few things that were special and popped, like the gorgeous turquoise Kate Spade business card holder with the letter S on it.  Other things are just fun and fill the jar, like the assortment of pens.  Not everything has to be expensive, I found some really cute little sticky note tabs at staples that were totally on theme and also cheap.  It’s about the items all together, not each one individually.Mason Jar Gifts by the 3 R's blog

The one thing I struggled with was the animal for the top of her jar.  Scout used to say she wanted to be a marine biologist, so when I saw the dolphin I thought it would be perfect.  And visually, it totally is.  However, I didn’t think about how it was larger than the lid, so you couldn’t get the ring part of the lid off over the top flat piece, once the dolphin was attached.  Ideally, I would simply have glued the lid together, glued the dolphin on and then spray painted.  But this is when I learned that super glue is not like hot glue, in pretty much all ways, and I totally botched my first attempt at gluing the lid together because I added way too much glue and it wouldn’t dry.  So I had to do it again, and then at that point I’d already spray painted it once so I didn’t want to spray the dolphin again so I figured, no big deal I’ll just glue it on after, right?  Wrong!  The dolphin would not stick.  So, do whatever you need to do to make your jar work, but make sure you glue your animals on BEFORE you paint, not after.  It still looked awesome though!  Even if the dolphin fell off 30 seconds after I gave her the gift.  Mason Jar Gifts by the 3 R's blog

So, the next time you need to give a gift think about using a mason jar because not only are they cute, they are also then functional, and if my gifts haven’t given you any ideas I know you can find a million different sites for more inspiration on Pinterest!  Most importantly this holiday season try not to get stressed about finding gifts, try to think of it more like a treasure hunt with the treasure being a gift that the recipient enjoys unwrapping as much as you enjoyed assembling it.

Ciao, Allison

Posted in Uncategorized | Tagged , , | Leave a comment

Dinosaur Candle Holder

It’s another Monday filled with Dinosaurs!

the3Rsblog_DinosaurCandleHolders_Title

After making my ring holder I was left with leftover dinosaurs and decided to make another cute Pinterest project I’d seen, plastic animal birthday candle holders!  In this case I used my dinosaurs and I painted them gold, but you can use any plastic animals you like and paint them any color you want.  I think for a kid’s birthday multi-colors would be really fun.

I didn’t photograph the steps for this tutorial, but it is really very simple.

Materials: Plastic animals, paint, candle holders, drill with small drillbit

Step 1: Select your animals.  Preferably you want an animal with a larger midsection that you can drill a hole into for your candle holder.  As you’ll see, with one dinosaur who had a large comb piece on his back, I put the candle holder in his tail.  But it is something to think about when selecting your animals.

Dinosaur Candle Holder Tutorial by the 3 R's blog

Step 2: Drill your holes.  I was using small plastic candle holders that we had at work (I’m going to now bring in my dinosaurs for us to use instead, since I work in the Science Department at a school I’m sure they’ll be a big hit!)  I’m sure you can find these candle holders somewhere, perhaps online, I didn’t have any luck at my local supermarkets.  But once you have your candle holders, use the spike they have on them, for inserting into the birthday confection, to decide what drill bit to use.  Mine were very small so I used the 5/64 drill bit.  Holding your animal firm on a surface that won’t get gouged by your drill, drill down carefully into a fat meaty part of your animal.  I basically eyeballed how far to drill down, just make sure not to drill all the way through.

Step 3: Insert your candle holders.  I didn’t use any glue because my candle holders were very snug in the holes I drilled, but you could also put a drop of super glue into the hole before inserting the candle holder spike.  Make sure that the spike can go almost all the way down into the animal, for better stability.

Dinosaur Candle Holder Tutorial by the 3 R's blog

Step 4: Paint.  I used gold acrylic paint I had lying around from another project and just brushed it on.  Don’t worry if the paint doesn’t stick that well with your first coat, the second coat will cover very nicely.  Depending on the color of the animal and the color of your paint you may need more than two coats.  I found my green dinosaurs especially hard to cover fully with the gold.  You can also opt to spray paint, but I found that didn’t work all that well with my ring holder so I was trying a different technique and was very happy with how it worked.

Step 5: Enjoy!  Sorry I don’t have any baked goods to model these on, I’ll try to remember to snap a photo when we have something fun at school for someone’s birthday.

I’ll be taking a brief break next week for Labor Day weekend, so stay tuned for my next tutorial in two weeks, and have a lovely holiday weekend if you are in the USA.  And good luck heading back to school for all the students and teachers out there!

Ciao, Allison

Posted in Uncategorized | 2 Comments

Dinosaur Ring Holder

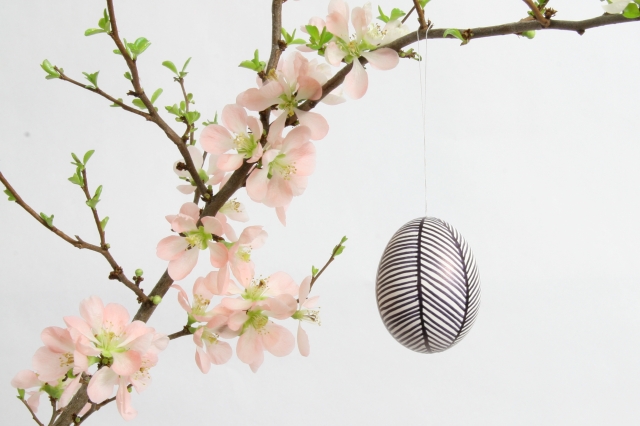
Quick question, who doesn’t love little plastic animals?  If you raised your hand you might want to leave now, because this project is all about the amazingness of some small plastic dinosaurs!  (And don’t worry, you can easily substitute your own favorite animal or plastic figurine, the tutorial works either way.)  If you have spent any time in the last few years on Pinterest or checking out craft blogs you’ve probably seen many, MANY, projects made using little plastic animals, and that’s because they are the cutest things around!  I think it has to do with reliving your childhood, but it could just be because they are fun.  For this project I chose dinosaurs.

Dinosaur Ring Holder Tutorial by the 3 R's blog

I had originally wanted to make a ring holder out of a giraffe, but my local Michaels didn’t have any sets of animals with giraffes, and the more I thought about it the more I realized that while giraffes are perfect for holding rings, they don’t exactly live with a lot of other long necked animals…  And then I spotted the dinosaurs and knew I just had to choose them instead.  I love dinosaurs.  Not in the way little boys do, when they know everything about them and all their names and such, but I still love them.  I trace it all back to this amazing children’s book I had as a kid about a little boy who imagined dinosaurs everywhere in his life.  Thanks to some internet research I think the book was called “Patrick’s Dinosaurs” by Carol and Donald Carrick.  Add on the fact that I’m a science teacher and basically I just think dinosaurs are cool.  And, they happen to have nice long necks and small heads, perfect for holding rings!

Materials: Wood block, Small plastic animals, Super glue, Spray paint

Dinosaur Ring Holder Tutorial by the 3 R's blogStep 1: Choose your animals.  My box of dinosaurs came with 14 dinosaurs, with some of them being duplicates.  I knew I wanted all my featured dinosaurs to be unique, so I could weed out the duplicates, but then I basically chose ones that looked fun and also would easily hold my rings.  Well, except for the Triceratops, I chose him simply because I’ve always liked Triceratops. Dinosaur Ring Holder Tutorial by the 3 R's blog
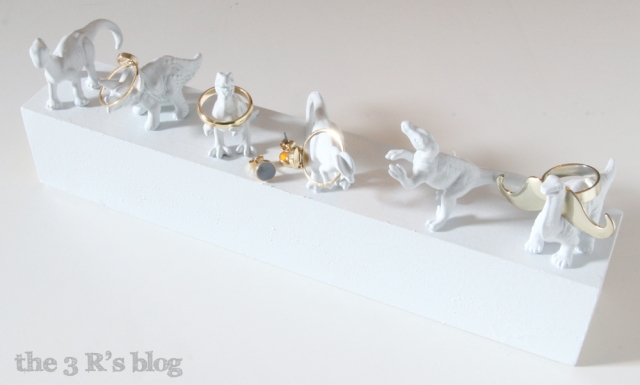
Step 2: Arrange your animals.  This really goes hand in hand with Step 1, because I laid them out as I chose them, to see how many dinosaurs I could fit.  Some of them had long tails for balance so that took up more space, and I decided I didn’t want to squish as many as possible, I wanted them to have some room to breath, so I ended up with 6 on my piece of wood.  (Which is a piece of basswood, 10 inches long and 1 3/4 inches square.)  I also tested them out to make sure my rings would actually fit as I imagined.

Dinosaur Ring Holder Tutorial by the 3 R's blogDinosaur Ring Holder Tutorial by the 3 R's blog

Step 3: Glue your animals.  For this project I decided super glue was best, because you wouldn’t see it like you might see hot glue.  I think you could also use something like E6000 or an epoxy resin, but I didn’t feel it was necessary.  The super glue makes a pretty solid bond, especially given the porous nature of the wood, and I didn’t need these animals to hold anything all that heavy.  Plus I love how fast super glue is!  Two key points though. First, glue before you paint, that way the paint can seal the connection between the animal and the wood.  If you try to paint them first, then you’ll end up with the paint-plastic being the bond that has to hold, not the glue-plastic, and trust me the paint-plastic bond is not that strong.  Second, as I have recently learned from my friend Erin, the key to super glue is ‘less is more.’  Use it very sparingly.  I basically smeared one drop on each foot of my animals so there was a thin layer coating the surface that would touch the wood.  Also make note if any other part of the animal touches the wood, like the tail, and secure that appendage as well.  Once you have added glue to all the points of contact between the animal and the wood, gently hold it in place for a few seconds.  I found the connection seemed pretty secure, even before I added the paint.

Dinosaur Ring Holder Tutorial by the 3 R's blog

Step 4: Paint!  I decided that given the odd shape of the animals and the plastic, spray paint was really best.  I chose white, because I was going for a porcelain look once it was finished, and luckily I already had a can of gloss white on hand.  And yes, in theory the spray paint worked just fine.  However I really wish I’d taken the time to prime the whole piece, especially the wood.  I found the wood soaked up the paint really easily and so I had to do a million coats.  (Like 8-10 maybe over a week.)  And despite all that there are still bits of green showing through on some of my dinosaurs.  So, if I were to do this again, I’d get primer, or even just a nice thick acrylic paint and a paint brush and I’d give the whole thing a good coat or two before turning to my spray paint.  I do like how the spray paint built up and dulled some of the detail of the plastic figures, because then they took on more of the porcelain look I was going for.  Because I live in NYC, spray painting is not all that easy to do, but I discovered that for small projects like this I can place the item to be painted into a cardboard box, and then carry it out to my building’s back alley and paint straight into my box.  The fumes blow away on the wind but none of the actual paint gets on anything else because it has all been captured by the box.  One key to spray paint is patience.  You want to do thin coats, holding the can at least 6-12 inches away from your object.  Go slowly.  If you decided to just hand paint everything you could have the ability to paint the animals different colors.  In that case you might want to wait and glue the animals down after you paint them, just make sure there is no paint on any of the connection points between the animal and the wood.

Dinosaur Ring Holder Tutorial by the 3 R's blog

Dinosaur Ring Holder Tutorial by the 3 R's blog

Step 5: Decorate and enjoy!  I found that my dinosaurs were perfect for holding my rings, and I could even leave small earring studs that matched my rings sitting on the wood at the dinos feet.

Dinosaur Ring Holder Tutorial by the 3 R's blog

I haven’t tried out all of my dinos yet, because the paint on the plastic parts still wasn’t quite dry when I did my final photo shoot, but so far I’m pleased with how it is working and I’m hoping this will make wearing jewelry on a daily basis easier and more fun!  You could also do this on a smaller scale with just one or two figurines if you didn’t want such a large built up piece sitting on your counter all the time.  One larger dinosaur to hold your wedding ring at night could be very nice.

Dinosaur Ring Holder Tutorial by the 3 R's blog

I haven’t tried this yet, but I’m betting that I could also hang some simple dangly earrings from my dinos short little arms or tails, and I could even drape a small bracelet around one of the dinos on the end, so this could really become a multi-purpose jewelry holder instead of being just for rings.  Either way I’m pleased with the result, even if the painting process didn’t go as smoothly as I originally thought it would.

Dinosaur Ring Holder Tutorial by the 3 R's blog

If you could make your own jewelry holder, which animals would you choose?

Ciao, Allison

Posted in Uncategorized | Tagged , , , | 4 Comments

Scarf Organizer

I’m really excited about this newest project, because not only does it help me organize a part of my life that has been desperately unorganized (my scarves!) but it utilizes something that I’ve had lying around as a left over from other projects, and I love when I can find a new use for something like this.DIY Scarf Organizer Tutorial by the3Rsblog You have probably seen something similar out there on Pinterest or other blogs, the ones I’ve usually seen involve plastic shower curtain rings and a hanger.  Sound familiar?  Well I have been wanting to make one for a little while, but most of my scarves are thick and bulky scarves for NYC winters and I wasn’t sure that the shower curtain rings would be large enough.  If I was organizing belts or neckties, or even thin decorative scarves it wouldn’t be a problem, but I felt like I needed to make my organizer out of larger rings, and here is where the really genius part comes in, the part I’m proudest of.  I realized that I could use all of the mason jar lids that I had lying around that I had no use for!  I’ve made a lot of mason jar projects, and while every now and then the project utilizes the lid (my sewing kit comes to mind) usually they just use the glass part of the jar (like my hanging planters.)  Of course if you don’t happen to have a similar stash of mason jar lids, you can apply my tutorial to just about any sort of plastic or metal ring that you have lying around.

Materials: Mason jar lids, hot glue gun, ribbon, scissorsDIY Scarf Organizer Tutorial by the3RsblogStep 1: Planning.  I was able to put my hands on 7 mason jar lids, so I decided to do a large hexagon shape.  If I had found more I might have done more of a pyramid, but you use what you have, right?DIY Scarf Organizer Tutorial by the3RsblogStep 2: Begin gluing.  The one thing that makes the mason jar lids harder than, for instance, plastic shower curtain rings, is their slightly odd shape.  This meant I couldn’t just tape them together like most scarf organizer tutorials suggest, so I turned to my trusty hot glue gun.  The key was leaving the two lids lying flat on my table surface and squeezing glue into the space in between.  I knew I wanted the outer most part to just touch, but that left a large gab on the other side so I filled that in with the hot glue, which becomes essentially a spacer.  Don’t worry about how the glue looks, you’ll be covering the whole piece in ribbon anyway. DIY Scarf Organizer Tutorial by the3RsblogStep 3: Keep gluing.  I found it was easiest to attach the rings into sets of two first.DIY Scarf Organizer Tutorial by the3RsblogStep 4: Assemble all your pieces.  After gluing the first six rings into sets of two, I carefully connected them to each other, and to the seventh ring, to make my hexagon shape.DIY Scarf Organizer Tutorial by the3RsblogStep 5: Attach your ribbon.  I decided to buy black ribbon as main color, and then some green ribbon for an accent color.  I decided to cover the whole shape in the black first, and then add the green on the outer edge.  I used approximately 12 yards of black ribbon to cover the whole piece, and this is with 3.5 inch mason jar lids.  You’ll need more or less, depending on the size of your lids and how many you have.  To start wrapping your ribbon you’ll want to start where two of your lids attach to each other, and glue the end of your ribbon to the inside edge of the lid.  I knew I wanted the flat top piece of the lid to be the front of my finished piece, so I kept that in mind when wrapping the ribbon.DIY Scarf Organizer Tutorial by the3RsblogStep 6: Wrap your first intersection.  After attaching your ribbon you want to carefully wrap it around your first lid intersection.  I used a small drop of hot glue to attach the ribbon on the underside, after looping around the intersection once.  This makes sure it is very secure, and helps to secure the connection between the two lids.  DIY Scarf Organizer Tutorial by the3RsblogStep 7: Continue wrapping the lid.  I chose to loop my ribbon around each intersection at least twice.  This was so I could be sure of the secure connection, but also because I found it was the best way to make sure all of the metal of the lid was covered with ribbon.  After wrapping the intersection I simply continued on and started wrapping my ribbon around the lid, moving around the curve towards the next intersection.  I found that I could use a small drop of glue to secure the ribbon every few loops, it certainly wasn’t necessary to glue it each time I wrapped it around the lid.  However, because of the funny shape of the lid I did find it necessary to pull my ribbon very tightly so that there were no weird bubbles or bulges.  I wanted it to look tightly fitted to the lid at all points.  DIY Scarf Organizer Tutorial by the3RsblogStep 8: Continue wrapping.  I originally thought I’d use one piece of ribbon to continuously wrap the whole shape, but I suddenly found myself in one of those horrible math problems where you have a certain number of islands and bridges and you can only cross each one once… Do you know the kind I’m talking about?  Well anyway, there may have been a way to only wrap each section once and cover the whole shape, but I didn’t really care to figure it out.  So I went around two lids, and formed a figure 8 shape, and then cut the ribbon and began on the next two lids.  Eventually I covered the whole shade except the center ring, and so I used one last piece of ribbon to cover the last center ring.  Really it doesn’t matter, with the one sided shape of the lid you can easily hid ribbon ends on the inside edge of the lid and they are hidden from the front. DIY Scarf Organizer Tutorial by the3RsblogStep 9: Finish your base color.  As I said earlier, I decided to wrap the whole shape in black and then add my light green to the outside edge.  You could also decide to do each ring in a different color and not add any embellishments, that’s up to you.  DIY Scarf Organizer Tutorial by the3RsblogStep 10: Add embellishments.  For my design I decided to add a stripe of green around the outer edge after I finished wrapping the whole piece in black.  I used a little bit of hot glue to attach the end of the green ribbon into one of the valleys where two lids met on the outside, and then I slowly wrapped it adding a bit of hot glue every inch or two.  The most important part to attach was each valley, so I put hot glue on either side of the valley part and then used my scissors to press the ribbon as far down into the valley as I could. the3Rsblog_ScarfOrganizer_Finished_3Step 11: Add scarves and enjoy! the3Rsblog_ScarfOrganizer_Finished_AI’m pretty happy with my organizer, and now I can’t wait to hang it up in my closet.  I decided not to attach it to a hanger because I’m going to hang it from a hook on my closet door.  But, you could easily use the same technique to attach the mason jar lids to a hanger and wrap the whole piece, including the hanger, so that once your are finished you can hang your scarves from the hanging rod along with your other clothes.  Theoretically, depending on your stash of lids, you could also combine two different sized mason jar lids for different types of scarves.  Just make sure to lay it all out before you start gluing any of the lids together! the3Rsblog_ScarfOrganizer_Finished_5Good luck, and stay tuned next Monday for another organizer, this time aimed at a slightly smaller accessory in your wardrobe!  Ciao, Allison

Posted in Uncategorized | Tagged , , , | 3 Comments